Adding a Preview Image for an Asset
You can add or change a preview image of any asset that appears in the Preview column in the asset list. This can be done from either the Assest > Manage tab or the Production tab.
The following image types are supported for preview images: PNG, JPEG, GIF, BMP, TGA, TIFF, PSD, AI and PDF.
If you upload a movie clip (MP4 or MOV) as a preview, the first frame of the movie will automatically be set as the image. You will be able to play the clip from the Preview column.
For an animated GIF or video file, the first frame will automatically be set as the preview image. You will NOT be able to play these files.
- In the top menu, click Assets > Manage.
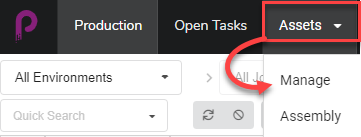
The assets list opens.
OR
In the top menu, click on the Production tab.
- Use the All Enviroments and/or All Jobs drop-down menu filters to bring up the desired asset(s).
- Click the check box of the asset whose thumbnail you wish to change.
- In the toolbar above the asset list, click on the Upload File button.

The Upload File dialog box appears.
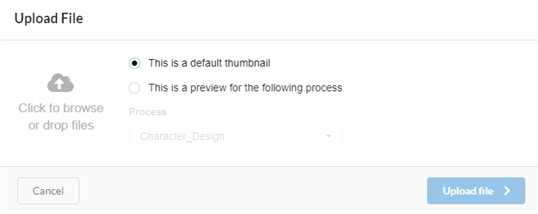
- Select one of the following options:
- This is a default thumbnail to upload an image or movie clip (MP4 or MOV) that will be a visual reference for all the tasks in the selected row.
- This is a preview for the following process to associate an image or movie clip (MP4 or MOV) with a specific task in the selected row.
When selecting this option, the Process drop-down menu is enabled. Select the task you want to associate with the preview image from this list. After the file is uploaded, the name of the task will appear near the corner of the thumbnail.
- To upload an image, either click on the Click to browse button or drag and drop the file over it.
- Click the Upload File button.
The selected image/movie clip appears in the Preview column.
TIPTo view the full-size image/movie clip, click on the Open the image in a new tab
icon that appears when you hover over the bottom of the preview image.