The Deformation toolbar contains the various tools and options used to create the Deformation Effect, the toolbar is displayed in the default interface.
![]()
The Rigging Tool is used to create
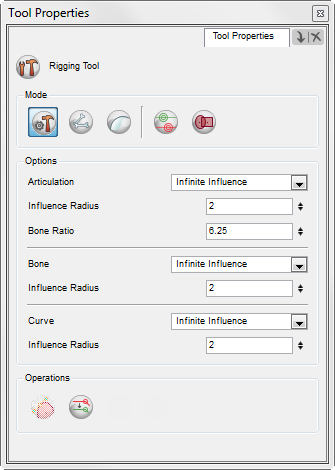
In the Rigging Tool Properties dialog box, you can customize not only the behavior of the tool but also the settings of the deformers that you will create:
![]() Automatic Mode: When the tools properties are set to Automatic mode, the Rigging tool will automatically create
Automatic Mode: When the tools properties are set to Automatic mode, the Rigging tool will automatically create
![]() Bone Mode: When the tools properties are set to Bone mode, the Rigging tool will create Bone deformers.
Bone Mode: When the tools properties are set to Bone mode, the Rigging tool will create Bone deformers.
![]() Bone Mode: When the tools properties are set to Bone mode, the Rigging tool will create Bone deformers.
Bone Mode: When the tools properties are set to Bone mode, the Rigging tool will create Bone deformers.
![]() Curve Mode: When the tools properties are set to Curve mode, the Rigging tool will create Curve deformers.
Curve Mode: When the tools properties are set to Curve mode, the Rigging tool will create Curve deformers.
![]() Show All Manipulators: The Show All Manipulators mode lets you immediately see the resting position in red (Setup) and the animated position in green. Refer to the
Show All Manipulators: The Show All Manipulators mode lets you immediately see the resting position in red (Setup) and the animated position in green. Refer to the
![]() Show All Zones of Influence: The Show All Zones of Influence lets you visualize the area within which the art will be influenced by the deformation effect—see
Show All Zones of Influence: The Show All Zones of Influence lets you visualize the area within which the art will be influenced by the deformation effect—see
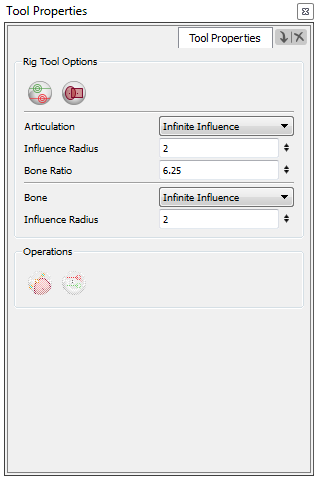
Articulation: You can choose which Zone of Influence setting will be used by default when creating an articulation using the Rigging tool. You can choose between these 4 options:
Zero Influence: The Zone of Influence does not exist. No deformation will happen.
Infinite Influence: This is the default option and is the most commonly used. The Zone of Influence has no boundary and covers the whole element to which the deformer is linked and its children, excluding areas that are already part of another elliptic or shaped Zone of Influence. The Infinite Influence zone will extend from the centre of your skeleton to infinity, working perpendicular to the skeleton.
Elliptic Influence: The Zone of Influence boundary is defined by an elliptical shape which size can be customized using the Bone![]() tool. The Elliptic Influence will most likely be used on a bitmap picture you wish to deform.
tool. The Elliptic Influence will most likely be used on a bitmap picture you wish to deform.
Shaped Influence: The Zone of Influence boundary is defined by a shape which you can customize using the Transform ![]() tool. The Shaped Influence will most likely be used on a bitmap picture you wish to deform.
tool. The Shaped Influence will most likely be used on a bitmap picture you wish to deform.
Influence Radius: This value is the size of the influence zone. The default value is 2.
BoneRatio: This value sets the size of the articulation that will be created relative to the size of the bone that precedes it.
Bone: You can choose which Zone of Influence setting will be used by default when creating a bone deformer using the Rigging tool. You can choose between these 4 options:
Zero Influence: The Zone of Influence does not exist. No deformation will happen.
Infinite Influence: This is the default option and is the most commonly used. The Zone of Influence has no boundary and covers the whole element which the deformer is linked to and its children, excluding areas that are already part of another elliptic or shaped Zone of Influence. The Infinite Influence zone will extend from the centre of your skeleton to infinity, working perpendicular to the skeleton.
Elliptic Influence: The Zone of Influence boundary is defined by an elliptical shape which size can be customized using the Bone, ![]() tool. The Elliptic Influence will most likely be used on a bitmap picture you wish to deform.
tool. The Elliptic Influence will most likely be used on a bitmap picture you wish to deform.
Shaped Influence: The Zone of Influence boundary is defined by a shape which you can customize using the Transform ![]() tool. The Shaped Influence will most likely be used on a bitmap picture you wish to deform.
tool. The Shaped Influence will most likely be used on a bitmap picture you wish to deform.
Influence Radius: This value is the size of the Zone of Influence. The default value is 2.
Curve: You can choose which Zone of Influence setting will be used by default when creating a curve deformer using the Rigging tool. You can choose between these 4 options:
Zero Influence: The Zone of Influence does not exist. No deformation will happen.
Infinite Influence: This is the option selected by default and is the most commonly used. The Zone of Influence has no boundary and covers the whole element which the deformer is linked to and its children, excluding areas that are already part of another elliptic or shaped Zone of Influence. The Infinite influence zone will from the centre of your skeleton, going toward infinity, working in perpendicular with the skeleton.
Elliptic Influence: The Zone of Influence boundary is defined by an elliptical shape which size can be customized using the Bone, Articulation or Curve module properties or by using the Transform ![]() tool. The Elliptic Influence will most likely be used on a bitmap picture you wish to deform.
tool. The Elliptic Influence will most likely be used on a bitmap picture you wish to deform.
Shaped Influence: The Zone of Influence boundary is defined by a shape which you can customize using the Transform ![]() tool. The Shaped Influence will most likely be used on a bitmap picture you wish to deform.
tool. The Shaped Influence will most likely be used on a bitmap picture you wish to deform.
Influence Radius: This value is the size of the Zone of Influence. The default value is 2.
![]() Convert Elliptic Zone of Influence to Shape: After you have created a deformation chain using Elliptic as the Zone of Influence type, you can select your deformer and click on this button to convert it to a Shape type. Control points will appear around the shape making it easy to customize.
Convert Elliptic Zone of Influence to Shape: After you have created a deformation chain using Elliptic as the Zone of Influence type, you can select your deformer and click on this button to convert it to a Shape type. Control points will appear around the shape making it easy to customize.
![]() Copy Resting Position to Current: Use this option to copy the resting position of the deformation skeleton to the current frame.
Copy Resting Position to Current: Use this option to copy the resting position of the deformation skeleton to the current frame.
When you are in Setup Mode![]() you can use the Transform
you can use the Transform ![]() tool to adjust the position, resize and tweak the Bone
tool to adjust the position, resize and tweak the Bone
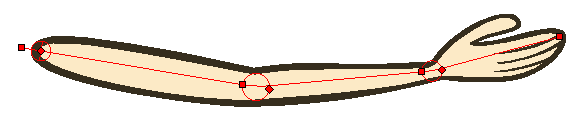
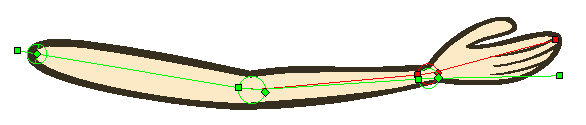
The Show All Manipulators ![]() option lets you visualize the resting position in red (Setup Mode) and the active position in light green at the same time.
option lets you visualize the resting position in red (Setup Mode) and the active position in light green at the same time.
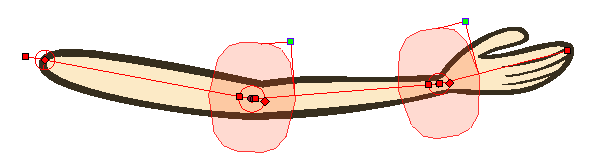
This option will display the Zones of Influence ![]() for all of the deformers in your project. Note that the deformer’s controls must be visible in order for its Zone of Influence to show. Zones will not be displayed when a deformer’s Zone of Influence is set to Infinite or Zero.
for all of the deformers in your project. Note that the deformer’s controls must be visible in order for its Zone of Influence to show. Zones will not be displayed when a deformer’s Zone of Influence is set to Infinite or Zero.
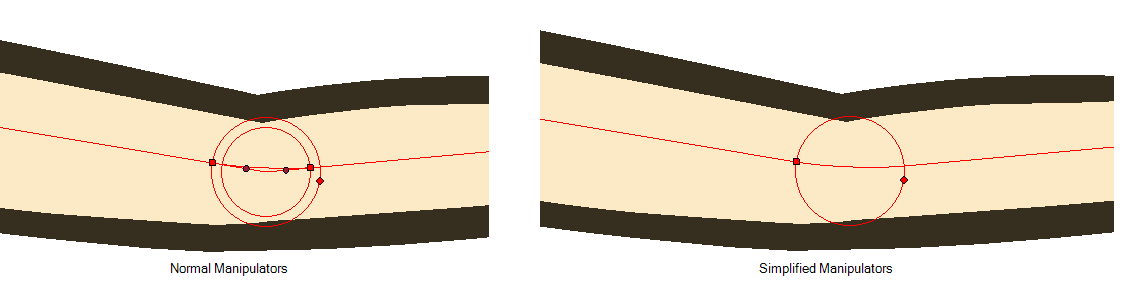
Enabling the Show Simplified Manipulators![]() will hide some of the more advanced control handles that are visible in the Camera view. This can prove useful when animating, as it prevents you from inadvertently moving the handles.
will hide some of the more advanced control handles that are visible in the Camera view. This can prove useful when animating, as it prevents you from inadvertently moving the handles.
When you click on this ![]() button, all manipulators displayed in the Camera view will all be hidden and only the manipulators for the selected deformation module will be displayed.
button, all manipulators displayed in the Camera view will all be hidden and only the manipulators for the selected deformation module will be displayed.
This ![]() option adds a Deformation Group above the selected element. This contains all the basic deformation module that you need to begin the manual construction of a deformation chain, i.e. Deformation-Root, Deformation-Composite and Deformation-Switch. If your preferences are set to create pose deformation, the subgroups linking to each of the drawings of the selected elements will also be created. After which you can use the various Deformation Effect modules from the Module Library and start rigging.
option adds a Deformation Group above the selected element. This contains all the basic deformation module that you need to begin the manual construction of a deformation chain, i.e. Deformation-Root, Deformation-Composite and Deformation-Switch. If your preferences are set to create pose deformation, the subgroups linking to each of the drawings of the selected elements will also be created. After which you can use the various Deformation Effect modules from the Module Library and start rigging.
This ![]() option adds a Deformation Group under the selected element. This contains all the basic deformation module that you need to begin the manual construction of a deformation chain, i.e. Deformation-Root, Deformation-Composite and Deformation-Switch. If your preferences are set to create pose deformation, the subgroups linking to each of the drawings of the selected elements will also be created. After which you can use the various Deformation Effect modules from the Module Library and start rigging.
option adds a Deformation Group under the selected element. This contains all the basic deformation module that you need to begin the manual construction of a deformation chain, i.e. Deformation-Root, Deformation-Composite and Deformation-Switch. If your preferences are set to create pose deformation, the subgroups linking to each of the drawings of the selected elements will also be created. After which you can use the various Deformation Effect modules from the Module Library and start rigging.
This ![]() option adds an output to your deformation which lets you hook a separate element that you want to be linked to the deformation chain but not be part of the deformation. For example, a hand connected to a wrist or when assembling different parts of a character without having the different deformation chains influencing one another. These elements will follow movement of the chain just like a regular cut-out character hierarchy piece without being influenced by the deformation of the arm.
option adds an output to your deformation which lets you hook a separate element that you want to be linked to the deformation chain but not be part of the deformation. For example, a hand connected to a wrist or when assembling different parts of a character without having the different deformation chains influencing one another. These elements will follow movement of the chain just like a regular cut-out character hierarchy piece without being influenced by the deformation of the arm.
The resting ![]() position is the original setup of your skeleton, that is the position it has before undergoing any deformation. Once you have created a deformation chain, you can use the Setup Mode to adjust the position and appearance of the rig to fit the element. Once your skeleton is in place you can use the Copy Resting Position to Current option, this will reset the current frame position to the resting position which you just modified leaving everything in place once you exit the Setup Mode. If you do not use this option, the rig will undergo a deformation and revert to the position it was before you set up your skeleton, in relation to the new resting position.
position is the original setup of your skeleton, that is the position it has before undergoing any deformation. Once you have created a deformation chain, you can use the Setup Mode to adjust the position and appearance of the rig to fit the element. Once your skeleton is in place you can use the Copy Resting Position to Current option, this will reset the current frame position to the resting position which you just modified leaving everything in place once you exit the Setup Mode. If you do not use this option, the rig will undergo a deformation and revert to the position it was before you set up your skeleton, in relation to the new resting position.
Once you have created a deformation chain using Elliptic as the Zone of Influence type, you can select your deformer and click on this button to convert it to a Shape ![]() type. Control points will appear around the shape making it easy to customize. This option is also available in the Rigging tool Tool Properties view.
type. Control points will appear around the shape making it easy to customize. This option is also available in the Rigging tool Tool Properties view.
After creating your deformation rig, you may want to convert a pose and the deformer in the current frame to a drawing with a duplicate deformer that you can animate. This task can be useful when you want to add a pose to a turnaround deformation rig you have already spent time creating and manipulating.
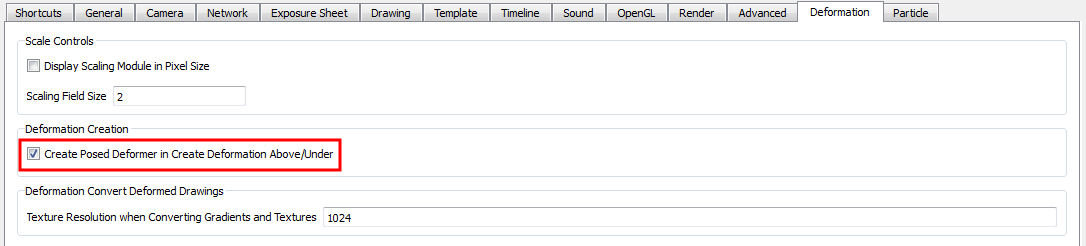
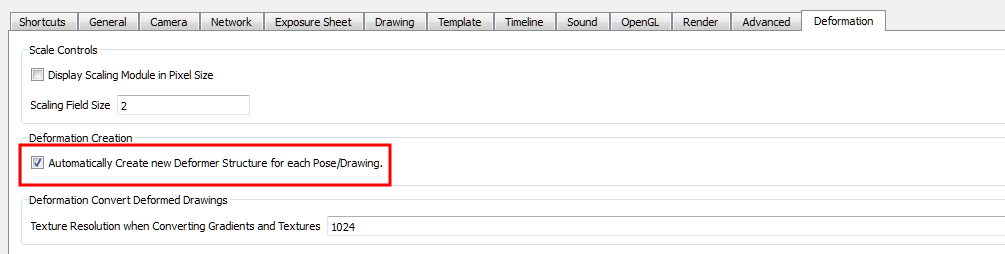
The Convert to New Drawing and Add Pose ![]() option will take the pose/drawing and the deformer of the selected frame and convert it to a new pose/drawing with the corresponding deformer. This option works with the default deformation preference settings. Go to Edit > Preferences > Deformation and make sure that Automatically Create New Deformer Structure for Each Pose/Drawing is selected.
option will take the pose/drawing and the deformer of the selected frame and convert it to a new pose/drawing with the corresponding deformer. This option works with the default deformation preference settings. Go to Edit > Preferences > Deformation and make sure that Automatically Create New Deformer Structure for Each Pose/Drawing is selected.
The Convert to New Drawing and Add Pose ![]() option will take the pose/drawing and the deformer of the selected frame and convert it to a new pose/drawing with the corresponding deformer. This option works with the default deformation preference settings. Go to Edit > Preferences > Deformation and make sure that Create Posed Deformer in Create Deformation Above/Under is selected.
option will take the pose/drawing and the deformer of the selected frame and convert it to a new pose/drawing with the corresponding deformer. This option works with the default deformation preference settings. Go to Edit > Preferences > Deformation and make sure that Create Posed Deformer in Create Deformation Above/Under is selected.