Where to Start with Inverse Kinematics?
This section explains the basics of the Inverse Kinematics tool. IK works best when you lock a part of the character to the spot, such as a foot on the floor, then select the entire body or another extremity and move it.
To lock a part in place, you use the IK Nail option.
To use the Inverse Kinematics tool:
|
1.
|
In the Tools toolbar, select the Inverse Kinematics  tool or press [Alt] + [8]. tool or press [Alt] + [8]. |
|
2.
|
In the Camera view, [Ctrl] + click (Windows/Linux) or [⌘] + click (Mac OS X) on a part of the body. |
The entire IK skeleton appears.

|
3.
|
Click on a part of the body and pull on it to move the character. |

|
4.
|
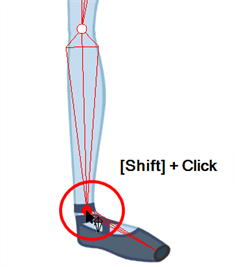
Hold down the [Shift] key and click on the pivot belonging to the part you want to lock in place. |
|
5.
|
Click on another part of the character and pull on it. You can [Shift] + click on a bone to lock the orientation of the bone. |
Related Topics