Linking your Layer to an External Image
When working on a large production, you may want to centralize your backgrounds into one directory instead of duplicating your background several times in different scenes. As backgrounds are generally reused in many scenes, some studios like to save space on the server and link the different scenes to the background directory. Also, if they modify one background, it is modified everywhere at the same time without having to re-import it. To do so, you must use the Timing columns.
Timing columns are Exposure Sheet columns linking to files that are outside the scene’s structure. Because of these external links, care must be taken not to break the links by moving the scene’s location or the background directory’s location. Breaking a link will result in images not appearing in your scene.
Refer to the
Timing chapter to learn more about using Timing columns.
If you are working with Toon Boom Harmony Server and all your scenes are located on a centralized server, you can also use the Link to Images option.
To link the scene to an external image (Harmony Server only):
|
1.
|
In the top menu, select File > Import > Link to Images. |
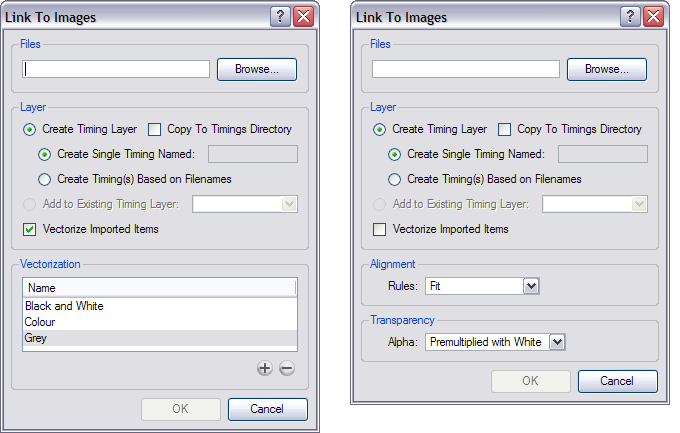
The Link to Images dialog box opens.
|
2.
|
Click on the Browse button to select the image you want to link your scene to. |
|
3.
|
Select the Create Timing Layer option if you want to create a new Timing column in your Xsheet view. |
|
‣
|
Enable the Create Single Timing Named option and type the new column name in the text field.
OR |
|
‣
|
Enable the Timing(s) Based on Filenames option if you want the new column to be named like the selected file. |
|
4.
|
Enable the Add to Existing Timing Layer option if you want to insert the file into an existing Timing column rather than creating a new one. |
|
5.
|
Enable the Copy to Timing Directory option if you want to copy the selected file into the Timing folder located in the scene directory. Note that the Timing column will link to the Timing folder. |
|
6.
|
Enable the Vectorize Imported Items option to vectorize the image you want to link to. The original image will not be modified. A vectorized copy will be placed in the same folder. |
|
7.
|
If you are vectorizing the image, select the vectorization parameters desired. |
|
8.
|
If you are linking to the original bitmap image, select the Alignment and Transparency options you want. |
The following options are available:
|
‣
|
Alignment > Rules > Fit
|
|
•
|
If your image orientation is portrait, this selection will stretch or shrink (but not distort) your image to match the full height of your project and therefore the camera frame. |
|
•
|
If your image orientation is landscape, this selection will stretch your image to the full width of the camera frame. |
|
‣
|
Alignment > Rules > Pan
|
This choice will perform the opposite operation of the Fit command.
|
•
|
If your image orientation is portrait, its width will be made to match the width of the frame. As a result, part of the image will extend beyond the height of the frame. |
|
•
|
If your image orientation is landscape, the image will extend beyond the width of the camera frame. This can be useful if you want to make your background move up and down, or from left to right to make it appear as if the camera is panning, or to actually perform a camera pan. |
|
‣
|
Alignment > Rules > Project Resolution |
|
•
|
This option will match your project’s resolution and centre your image in the frame. If your image resolution is smaller than that of your project, such as a 720 x 540 resolution and 640 x 480 image, the image will become blurry after being imported. Make sure that the size of your image matches, or is greater than, your scene resolution. |
|
9.
|
Click on the OK button. |
Related Topics