Advanced Scanning Techniques
In most cases, you only need to scan your drawings into empty cells in your exposure sheet. Harmony is flexible enough to allow you to add drawings in other ways. These other methods include:
| • | Scanning paper drawings without matching cells in the exposure sheet |
| • | Loading previously scanned images into matching cells in the exposure sheet |
Scanning Drawings without Matching Frames
If you want to preview one or more drawings that don’t have a corresponding list of cells in the Control Center’s database yet, you don’t have to go through the whole procedure of creating an environment, defining the jobs, scenes, and elements, and then creating an exposure sheet. These would be a list of cells that were not entered in the exposure sheet and do not appear in the Database Element Selector dialog box.
To be able to scan these new drawings, you must specify the path and file names for the drawings to be saved.
To manually build a list of drawings to Scan:
| 1. | Select File > Build Manual List. |
The Manual List dialog box appears.
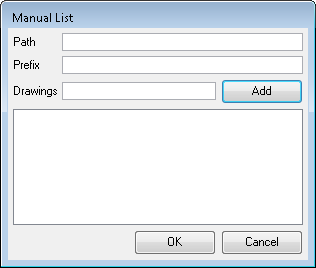
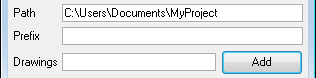
| 2. | In the Path field, type an existing directory path where you want to store the scanned drawings in the Path field. |
| 3. | You can type a name in the Prefix field that appears at the beginning of the scanned files that correspond to the drawing names you subsequently add to the manual list. |
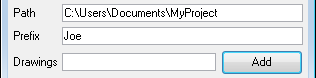
For example, if you enter the name of the character joe in the Prefix field, then add the drawing names 01 and 02, the Drawing List would display 01 and 02, but once you scan the drawings, the files would appear as follows:
| ‣ | joe-01 |
| ‣ | joe-02 |
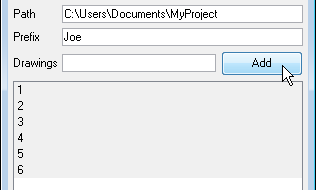
| 4. | Type the name of the drawing you want to scan in the Drawings field and click the Add button. The name of your drawing appears in the Drawings panel. Repeat for every drawings you must add. |


| ‣ | For a quick way to create a series of drawings, you can type the first number and the last number with a colon symbol (:) in between. |
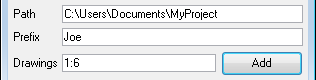
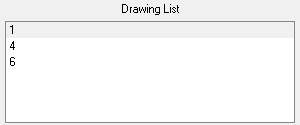
For example, if you want to create a series of drawings number one to six, you would type the following in the Drawings field and click on the Add button:
| • | 1:6 |
| 5. | Select the drawings you want to add to the Drawing List. By default, all the entries appear selected, but you can select the drawing(s) you want to scan. |
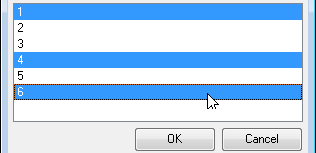
| 6. | Click the OK button to close the Manual List dialog box. |
The selected drawings appear in the Drawing List of the Scan module’s Control Panel.