


Chapter 14: How to Use Deformers
Deformation technology allows you to deform bitmap and vector drawings over a period of time. You can link deformers to create a hierarchy of deformation. You can deform a character made out of one, or many, drawing or image layers and make it move as if it were a cut-out puppet.
About the Deformation Effects
Deformations let you animate bitmap or vector-based graphics, including gradients and textures. Deformations act as a skeleton with limbs and articulations you can bend, reshape, and curve. You can deform a character made out of one, or many, drawing or image layers and make it move as if it were a cut-out puppet.
Bone Deformer
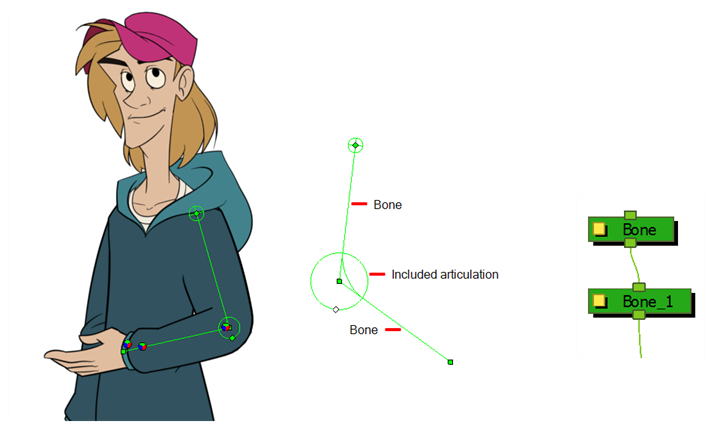
The Bone deformation allows you to create a skeleton structure in which the parent bone moves the child bone. The Bone deformation is useful when animating the extremities of a character, such as the arms or legs, adding fluidity and a natural feel to the animation. It can be manipulated to rotate a limb at an articulation joint and to shorten or elongate the extremities of a limb. It's also quite handy for bending the torso.
Game Bone Deformer
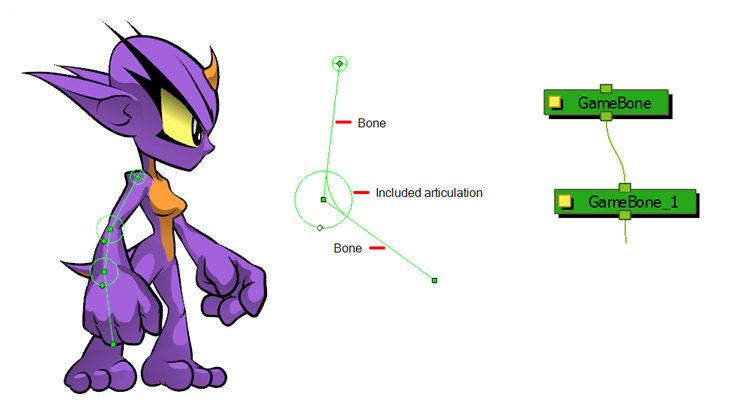
The Game Bone deformation is very similar to the Bone deformation and allows you to create a skeleton structure in which the parent bone moves the child bone. The difference is that the Game Bone deformation is optimized to export to game engines, mainly Unity.
The Game Bone deformation is mostly used when animating the extremities of a character, such as the arms or legs, adding fluidity and a natural feel to the animation. The Game Bone deformation can be manipulated to rotate a limb at an articulation joint and to shorten or elongate the extremities of a limb. It's also quite useful for bending the torso.
The main difference
Curve Deformer
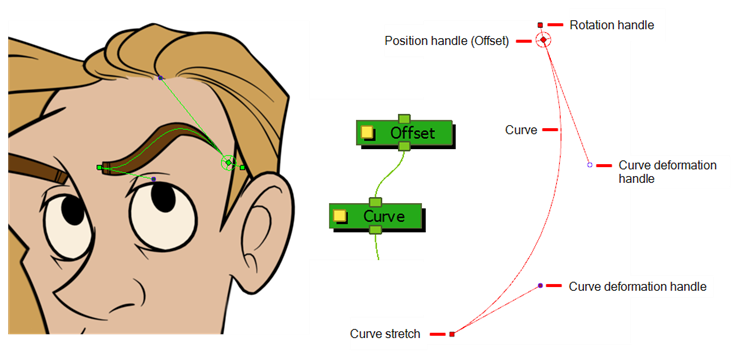
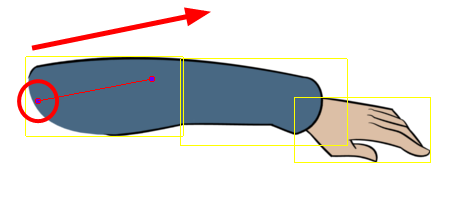
The Curve deformation allows you to deform an image using Bezier handles. For example, when editing curves, you can deform a straight line into an arc or a zigzag. Curve deformations are mostly used to animate elements that don't have joints, such as hair or facial features. However, in some cases they can be used to animate limbs to create a specific animation style, similar to the early rubber hose style of animation with typically simple, flowing curves without articulation (no hinged wrists or elbows).
Envelope Deformer
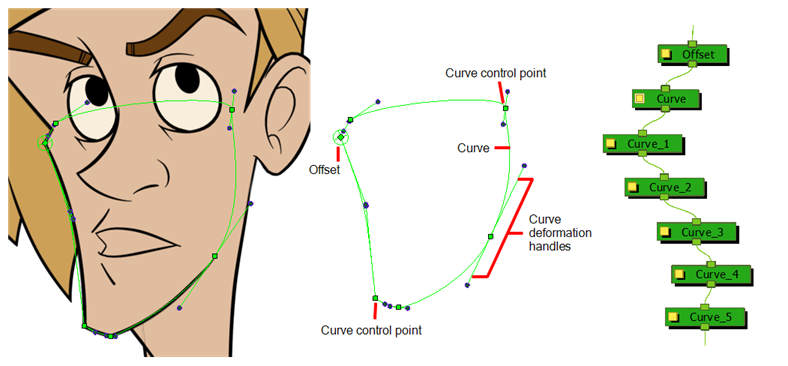
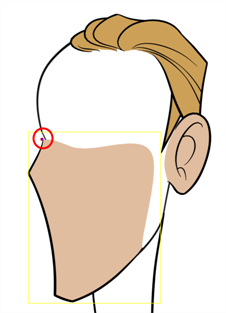
The Envelope deformation allows you to deform an image using Bezier handles located all around the contour of the shape. Envelope deformation chains are composed of Curve deformation nodes. It is regularly used to deform shapes, such as hair, cloak, shoulder shape, head shape and so on. You can use the Envelope deformation to deform a drawing so it looks like it changes from a profile view to a front view to create head and character rotations using only one set of drawings.
The main differences between the Curve and Envelope deformers is that the Envelope chain can be closed by connecting the last Curve deformation node to the initial Offset point. Once connected, the Offset point no longer repositions the entire chain, only its own control point.
Rigging
Using the Rigging tool, you can quickly create a basic deformation rig.
As you create your chains, the controls will be showing. However, whenever you close your project, the deformation controls display is turned off. When you reopen the project, you can display all controls or only some of them—see
Before adding deformations, you might want to use a default type of region of influence. You can set these parameters in the Rigging tool's properties
The
- From the Deformation toolbar, click the Rigging
 tool.
tool.
- In the Tool Properties view, in the Rig Tool Options section, enable the Automatically Create Group when Creating a New Deformation Rig
 option.
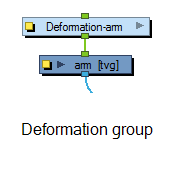
This option automatically creates a deformation group connected to the input port of the selected element. This group includes all the necessary deformation nodes you created.
- From the Deformation toolbar, click the Rigging tool.
- In the
- In the Camera view, create your rig. See the following procedures to learn how to add a specific deformation type.
- Once your element and the Rigging tool selected, in the Tool Properties view, enable the Bone
 mode or the Game Bone mode depending on your purpose—see Main Types of Deformations.
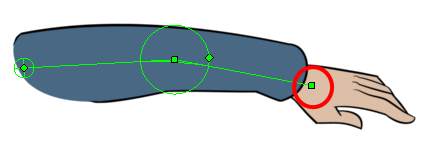
- Place the cursor at the root of your drawing or group of drawings, click once and release. For example, on the shoulder.
- Click again at the location where you want your first bone to finish and your second bone to start. An articulation control point will automatically be inserted between each bone you create. Note that the articulation parameters are part of the Bone and Game Bone nodes since Harmony 12.
- Repeat this until you are finished creating the Bone chain.
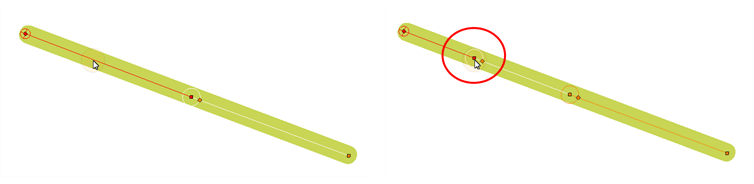
- If you need to insert a bone between existing ones, hold down the Alt key. When the Insert Bone cursor is displayed, click on the existing bone segment at the location where you want to add an additional bone.
- Note that you can click on any Bone articulation point to start a new bone chain from that point. Once the articulation point is selected (white), click on the location where you want to add a bone and a new bone chain will be created, parented to the previous one.
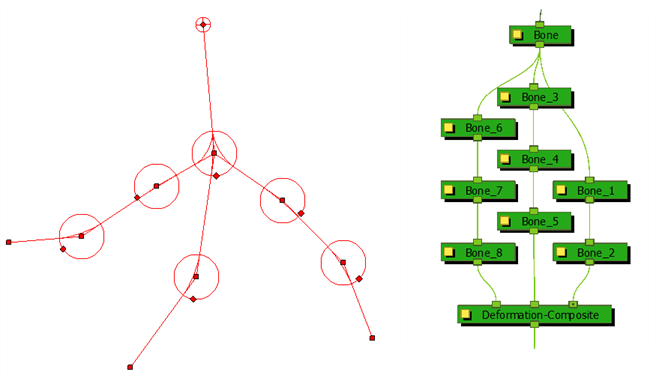
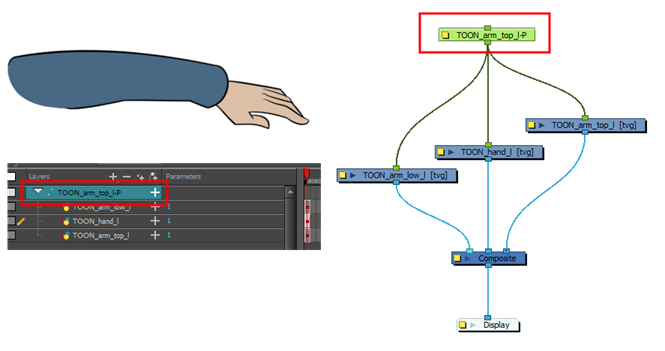
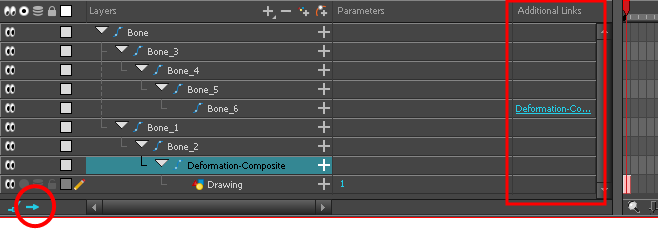
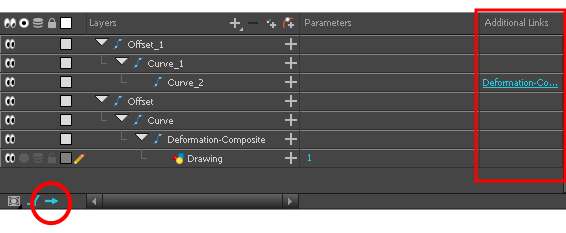
- When you have several chains controlling the same drawing or group of drawings, a Deformation Composite node is automatically be created and appears in the Timeline view. In the Additional Links section of the Timeline view, you can see which nodes are connected to the Deformation Composite.
- With the deformation nodes
 button. This will set the current resting position as the current frame one.
- Once your element and the Rigging tool selected, in the Tool Properties view, enable the Curve
 mode.
mode.
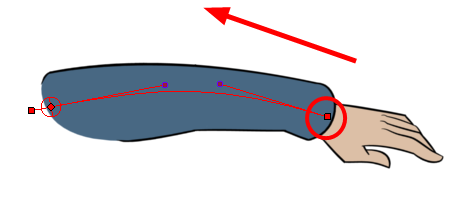
- Click at the root of your drawing, for example, the shoulder and drag to extend the control handle and release just as you would when using the Polyline tool
- Click again at the location where you want the curve to end and drag backwards to extend the second control handle.
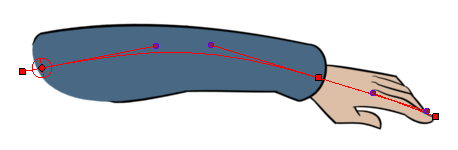
- Repeat this process until you have finished building the Curve chain.

- When you have several chains controlling the same drawing or group of drawings, a Deformation Composite node is automatically be created and appears in the Timeline view. In the Additional Links section of the Timeline view, you can see which nodes are connected to the Deformation Composite.
- With the deformation nodes button. This will set the current resting position as the current frame one.
- Once your element and the Rigging tool selected, in the Tool Properties view, enable the Envelope mode.
- Click at the starting point of your drawing shape, for example, the cheekbone and drag the cursor to extend the control handle and release just as you would when using the Polyline tool
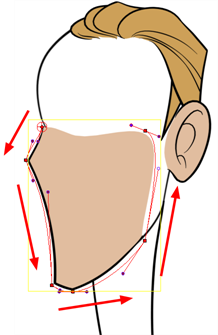
- Working as you would with the Curve deformer, continue adding control points around your shape. An Envelope chain is composed of Curve deformers. You can place your control points slightly outside of your contour line. As you go, place your cursor over the Bezier handle controls to reposition them. Hold down the Alt key to move only one of the two Bezier control handles.
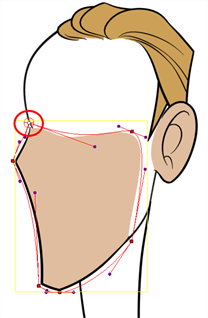
- To close Envelope deformer, hold down Alt and click on the Offset starting point.
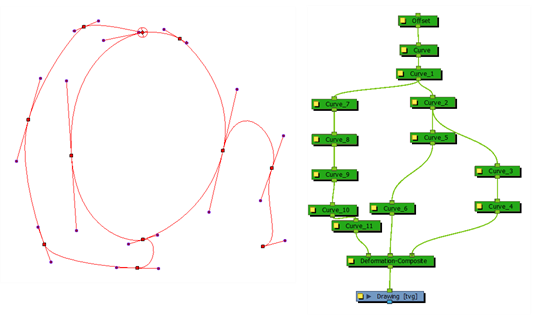
- When you have several chains controlling the same drawing or group of drawings, a Deformation Composite node is automatically be created and appears in the Timeline view. In the Additional Links section of the Timeline view, you can see which nodes are connected to the Deformation Composite.
- With the deformation nodes button. This will set the current resting position as the current frame one.
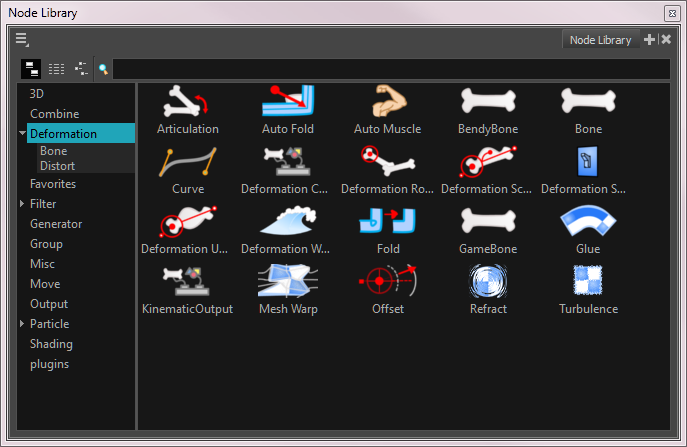
- In the Node Library view, select the Deformation category.
- From the Node Library view, select a deformation node and drag it to the Node view. Note that the Glue, Mesh Warp, Refract, and Turbulence nodes are not directly related to deformation rigging. You can read more about these effect in the Compositing and Effects Guide.
Adjusting the Deformation Chain
Once you have a deformation chain created, you can optimize its positioning to fit the element it will deform.
- In the
- In the Deformation toolbar, click the Show Selected Deformers and Hide All Others
 button to display the deformer controls in the Camera view. This also hides all the deformer controls that were displayed.
- In the Deformation toolbar, click the Rigging tool.
The chain turns from green to red. A green chain indicates the puppet is in animation mode. A red chain indicates the puppet is in a resting position. Make sure your chain is red.
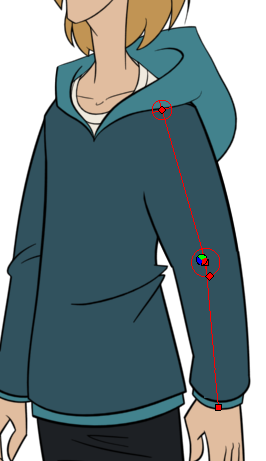
- In the Camera view, set up the deformation chain.
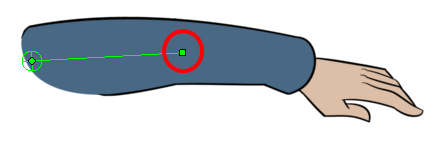
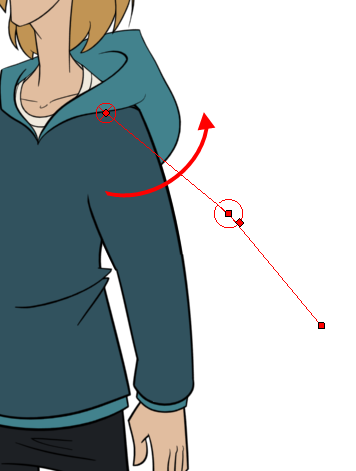
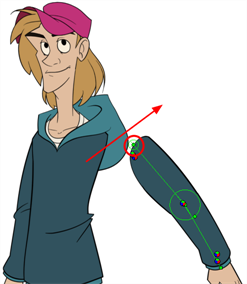
| ‣ | Rotate the first bone to change the angle of the chain. |
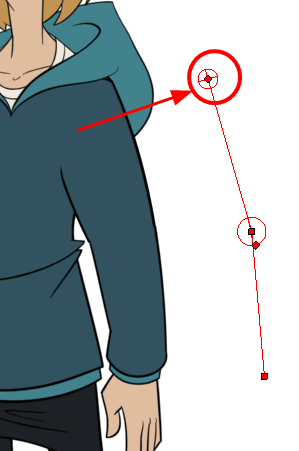
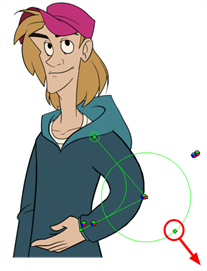
| ‣ | Use the root control to reposition (offset) the entire chain. |
| ‣ | Use the control points to reposition the articulations. This will elongate, shorten or change the direction of the bone and offset the subsequent children. |
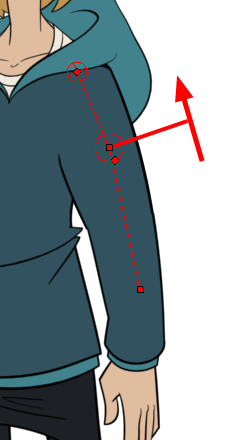
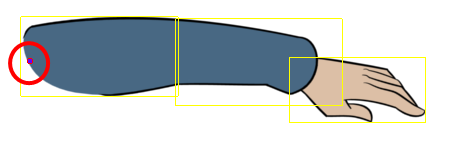
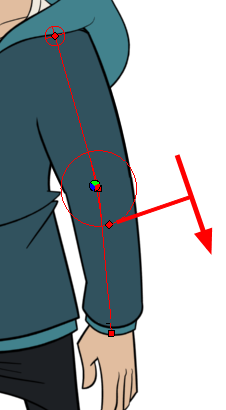
| ‣ | Use the articulation's control (square) to change the size of the articulation. For quality purposes, it is recommended to have an articulation which fits the diameter of the part it controls. |
- Repeat until all the articulations and bones of the chain are correctly aligned to the element to which it is linked. You can also set additional parameters in the Layer Properties window
- With the deformation nodes button. This will set the current resting position as the current frame one.
- Use the Transform
 tool. For optimal results, make sure the size of the articulation is approximately the same size as the drawing.
- If you need to insert a bone between existing ones, hold down the Alt key. When the Insert Bone cursor is displayed, click on the existing bone segment at the location where you want to add an additional bone.
Display the Deformer Controls
Before you can manipulate the deformer outside of the Rigging mode, you must display the deformation controls.
If you just created the deformation rig, the controls will still be showing. However, when you close your project, the deformers are turned off. When reopening a project, you must display the controls so you can you see the ones you need while animating.
- In the Camera,
- Do one of the following:
| ‣ | In the Camera toolbar, click the Show Control |
| ‣ | From the top menu, select View > Show > Control. |
| ‣ | Press Shift + F11. |
- In the Camera,
- In the Deformation toolbar, click the Show Selected Deformers and Hide All Others button.
The selected deformation controls appear in the Camera view and all the others are hidden.
- In
- In the Camera toolbar, click the Show Control
 button or press Shift + F11.
All deformation controls in scene are displayed.
- Do one of the following:
| ‣ | In the Camera toolbar, click the Hide All Controls |
| ‣ | From the top menu, select View > Hide All Controls. |
| ‣ | Press Shift + C. |
Animation
The controls to animate deformations work the same as those for setting up the chains. You simply need to create keyframes and position the control points.
As Envelope deformations are composed of Curve deformations, there are many similarities in the way they are animated.
- In the Timeline view, go the frame on which you want to create the first animation pose.
- In the Tools toolbar, select the Transform tool.
- If you want to create animation keyframes, enable the Animate
 mode in the Tools toolbar.
- Do one of the following:
- In the Timeline toolbar, click the Add Keyframe
button.
- Right-click and select Add Keyframe.
- Press F6.
A keyframe is added on the current frame.
- In the
- In the Deformation toolbar, click the Show Selected Deformers and Hide All Others
 button to display the deformer of the selected piece.
- In the Camera view, do the following:
- Rotate the first bone to rotate the limb.
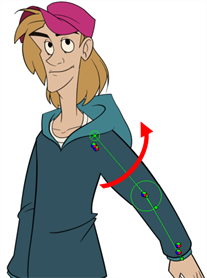
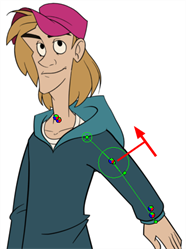
- Rotate the subsequent bones to bend the limb.
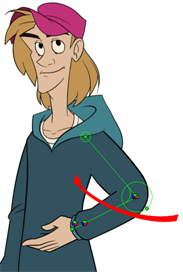
- Use the root control to reposition (offset) the entire chain.
- Use the control points to reposition the articulations. This will elongate, shorten, or change the direction of the bone and offset the subsequent children.
- Use the articulation's control (square) to change the size of the articulation. For quality purposes, it is recommended to have an articulation which fits the diameter of the part it controls.
- In the Timeline view, go the frame on which you want to set the next key pose. You will need to expend the exposure to see your drawings further down the Timeline view.
- Add a keyframe on the current frame by doing one of the following:
- In the Timeline toolbar, click the Add Keyframe
- Right-click and select Add Keyframe.
- Press F6.
- Repeat the previous steps to animate your character.
You can also manipulate the deformer by typing values directly in the Layer Properties of the deformation effect nodes.
