


Drawing with the Brush Tool

The Brush tool is pressure sensitive and lets you create a contour shape with a thick and thin line effect, as if it was created with a paint brush.
With the Brush tool, you can draw as vector or bitmap, depending on your preference. When you add a drawing layer, you can simply select the vector or bitmap option. If you draw with vector, you can enlarge your drawing and zoom into it without losing quality or resolution. You can also use the Contour Editor and Select tools to resize and modify lines. If you draw with bitmap, you will not be able to scale your drawing beyond 100% of its resolution without encountering pixelization issues.
You can create your own brush styles. A variety of brush styles are provided allowing you to create and save your own.This way you can create brushes with precise sizes and parameters and save them so you can draw and design with them. Renaming a brush can make it easier to identify and access the brushes you use most frequently.
A dynamic brush can be created for drawing using patterns created from your artwork. Create a new dynamic brush to copy a pattern you have drawn to reproduce it quickly. You can create dynamic brushes using a single or multiple patterns that automatically switch through the patterns as you draw.
- In the Timeline view, click the Add Drawing Layer
 button or press Ctrl + R (Windows/Linux) or ⌘ + R (Mac OS X).
The Add Drawing Layer window opens.
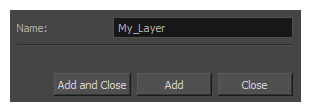
- In the Name field, name your new layer.
- Do one of the following:
| ‣ | Click Add to add a first layer and keep the window open to add more layers. |
| ‣ | Click Add and Close to add a new layer and close the window. |
A new drawing layer is added to the Timeline view.
- In the Timeline view, select the cell on which you want to draw.
- In the Tools toolbar, select the Brush
 tool or press Alt + B.
- In the Colour view, click a colour swatch to select a colour.

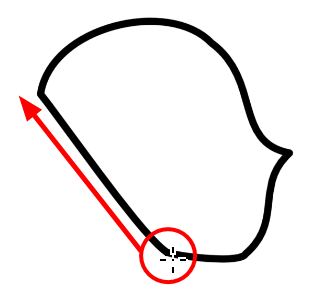
- In the Drawing or Camera view, start drawing.
| ‣ | Hold Ctrl (Windows/Linux) or ⌘ (Mac OS X) to force a line to join the start and end of the shape while drawing. |
- In the Tools toolbar, select the Brush tool or press Alt + B.
- In the Tool Properties view, select a brush style from the Presets section.

- In the Tools toolbar, select the Brush tool or press Alt + B.
- In the Tool Properties view, the preview area displays the stroke that will be produced after you customize the different parameters. Click the arrow button.

The Brush Properties window opens.
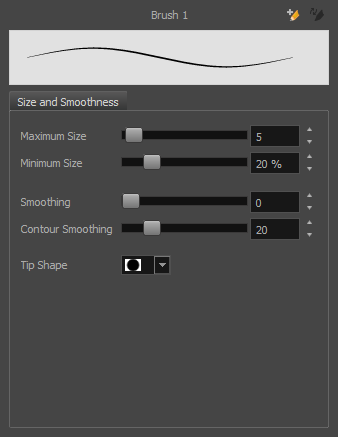
This is where you set the minimum and maximum sizes of your drawing tool which will produce the thick and thin effect on your stroke. This works with the pressure sensitivity of a pen tablet.
| Parameter | Description |
| Size and Smoothness | |
| Maximum Size | Sets the maximum width of the line. |
| Minimum Size | Sets the minimum width of the line in relation to the maximum size. |
| Smoothness | Lets you modify the central line smoothness of the line. This parameter smooths the initial movement of your line. Increasing the value will result in a smoother line with fewer control points. |
| Contour Smoothness | Optimizes the contour line smoothness of the line. This parameter smooths the contour of the line once it has been traced. The higher the value, the fewer control points will compose your line. |
| Tip Shape |
Lets you select a tip shape—from round and square ones to star shaped. This option is disabled when using a textured brush.
|

- Make sure your current brush has the settings you want in the preset you will create.
- In the Tool Properties view, do one of the following:
| ‣ | Click the arrow button to display the Brush Properties window and click the New Brush |
| ‣ | Click the New Brush |
| ‣ | From the Brush |
- In the New Preset window, type a name for your new brush preset.
The new brush is added to the end of the list of brush presets.
- Select the brush preset to update and click the arrow button to display the Brush Properties window.
- Change the brush settings and click the Update Brush Preset
 button in the upper-right corner.
- In the Tool Properties view, select a brush to rename.
- From the Brush
 menu, select Rename Brush.
- Type in a new name for the brush and click OK.
- In the Tool Properties view, select the brush preset you want to delete.
- Do one of the following:
| ‣ | Click the Delete Brush |
| ‣ | From the Brush |