Chapter 11: How to Import Bitmap Images
A bitmap image is an image composed of pixels that are both size and resolution dependent. In Harmony, you can import bitmap images and vectorize them, making the images editable. Then you can use a variety of drawing tools to edit the image. Or you can always keep the original bitmap image as is.
Also, you can choose to import bitmap images on bitmap or vector layers depending on your project.
NOTE: You can drag and drop a bitmap image directly from the Library into the scene (Camera) as a quick way of importing a bitmap image. However, you will not have access to all the import options.
 How to open the Import Images dialog box
- Do one of the following:
|
‣
|
From the top menu, select File > Import > Images. |
|
‣
|
In the File toolbar, click the Import Images  button. button. |
The Import Images dialog box opens.
How to import a bitmap image in its original format
- In the Files section of the Import Images dialog box, click Browse to find and select one or more images on your computer.
- Decide if the bitmap image will go on a new layer or an existing layer. To add the bitmap image to a new layer, go to step 3. To add the bitmap image to an existing layer, go to step 4.
- Add the bitmap image to a new layer by selecting the Create Layer(s) option and one of the following options and then proceed to step 5:
|
‣
|
Create Single Layer Named: Creates a layer you can name. |
|
‣
|
Create Layer(s) Based on Filenames: Creates a layer based on each unique filename prefix. For example, the filenames a-1.tga, a-2.tga and b-1.tga will create layers name "a" and "b", where "a" has two drawings and "b" has one. When creating a single layer from these three filenames, all three drawings will be inserted in the new layers.
|
- Select the Add to Existing Layer option to place the bitmap image on a layer you select from the list. If only vector layers are available in your scene, they will not be displayed in the list.
- Click OK.
How to import and vectorize a bitmap image
- In the Files section of the Import Images dialog box, click Browse to find and select one or more images on your computer.
- Decide if the bitmap image will go on a new layer or an existing layer. To add the bitmap image to a new layer, go to the next step. To add the bitmap image to an existing layer, go to step 4.
- In the Layer section, select the Create Layer option, and one of the following options to add the bitmap image to a new layer:
|
‣
|
Create Single Layer Named: Creates a layer you can name. |
|
‣
|
Create Layer(s) Based on Filenames: Creates a layer based on each unique filename prefix. For example, the filenames a-1.tga, a-2.tga and b-1.tga will create layers name "a" and "b", where "a" has two drawings and "b" has one. When creating a single layer from these three filenames, all three drawings will be inserted in the new layers.
|
- Select the Add to Existing Layer option to place the bitmap image on a layer you select from the list. If only vector
 layers are available in your scene, they will not be displayed in the list.
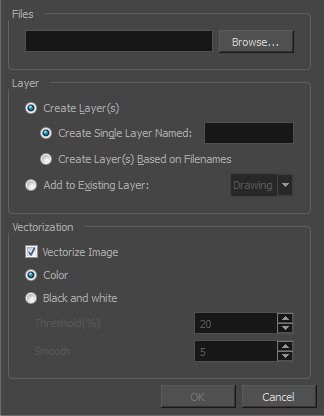
- In the Vectorization section, select the Vectorize Image option.
- Select one of the following options:
|
‣
|
Colour: To import the bitmap image as a colour image. |
|
‣
|
Black and White: To import the bitmap image as a black and white image. |
- Do one of the following:
|
‣
|
If you selected the Colour option, click OK. |
|
‣
|
If you selected the Black and White option, set the following parameters and click OK. |
| Parameter
|
Description
|
| Threshold |
Determines what values in the scanned image will be considered as part of the drawing, and what will be ignored and eliminated in the vectorized drawing. The lower the value, the darker the image and vice versa.
|
| Smooth |
Determines how smooth the lines will be. The lower the value, the more detail will be retained and vice versa.
|


