Rigging the Parts
You can start your deformation rig by creating the Bones or Curves on the character’s arms and legs. The style of animation you plan on producing will influence the style of rig you will use (Bones and Articulations or Curves).
 How to rig the arms and legs of the character turnaround
|
1.
|
In the Timeline view, make sure the time marker is set to the frame displaying your first drawing. |
|
2.
|
In the Network view, select your character’s arm or leg. |
|
3.
|
In the Deformation toolbar, select the Rigging  tool. tool. |
|
4.
|
In the Rigging Tool Properties, set the mode to Automatic  . . |
|
5.
|
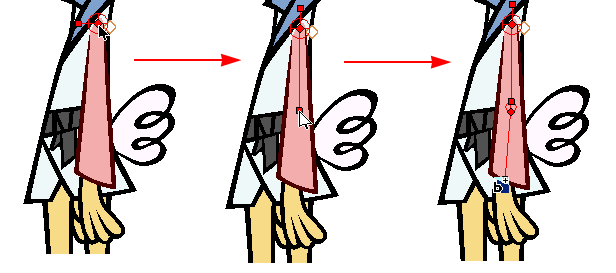
To create a Bones and Articulations structure: |
|
‣
|
Click on the extremity corresponding to the shoulder or hip of the limb and release to create the first rotation point. |
|
‣
|
Click again in the middle of the limb where the elbow or knee is located to create the first articulation. |
|
‣
|
Click one last time at the end of the limb, where the wrist or ankle rests to create the second bone.
 |
|
6.
|
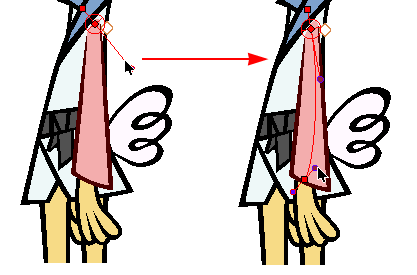
To create a Curve structure: |
|
‣
|
Click on the extremity corresponding to the shoulder or hip of the limb and drag the cursor to extend the first control handle.
 |
|
‣
|
Click at the end of the limb, where the wrist or ankle rests and drag the cursor to extend the second control handle. |
|
7.
|
In the Timeline view, move the time marker to display the frame with the next pose of that drawing element. |
|
8.
|
Repeat the previous steps until all of the element‘s different poses are rigged, then begin the whole process again for each limb. Although it is recommended to keep consistency in your rigging of different poses in the same element, you can choose a different type of rig for each pose if necessary. |
You can also set the Rigging Tool Properties mode to Curve  or Bone
  . This will prevent gesture mistakes leading to the creation of the wrong type of deformer.
Once you create a chain, you can modify its position and orientation using the Setup

Mode and Transform

tool—see
Skeleton Optimization.


