Rigging Guidelines
The following is a list of general guidelines to keep in mind when rigging your character. For information on how to use Harmony, refer to the Harmony User Guide or the Harmony video tutorials.
As you're planning the character rig for your game, keep in mind the style of the character, and create your custom colour palette. However, there are some limitations to consider if you plan to extract the game data:
|
•
|
Create rigs in the Timeline view only. The Network view can have complex connections that are not always interpreted well by game engines.
|
|
•
|
Nudge layers in Z space if you need to reorder layers. However, significant Z offsets are not supported within a character rig.
|
|
•
|
Make every layer in your game engine a separate scene in Harmony. If you have two characters at different depths, put them in separate scene files.
|
|
•
|
Character rigs in groups at the root level of your Harmony scene will render to a single plane in Unity, but use separate sprite sheet and animation data sets. Keep this in mind for scenes in which you may have more than one character interacting with each other.
|
|
•
|
Don’t use any effects. Effects like masks and colour overrides are not interpreted by game engines. Use only direct hierarchy, drawing swaps, and keyframe animation.
|
|
•
|
Don’t use 3D space. If you want to set things up in 3D space, you can do this when you get to your game engine.
|
|
•
|
Set your pivot points on Peg layers using the Rotate tool to set the pivot on the entire layer. Peg pivots are recommended over drawing pivots. You should also set the pivot points on your drawing layers, even if you don’t animate on them, as this will allow you to retrieve that information later on in the game engine if you need to put a locator on a drawing layer. |
|
•
|
Don’t use Morphing. This is not yet supported in game engines.
|
|
•
|
Both Morphing and Deform can be used and then baked out to individual drawings. These drawings will then show up as new drawings in your sprite sheet. Be wary of doing this too often as it will increase your texture space!
|
|
•
|
For your pegs, when you animate, use Bezier curves and set them to Separate. If you use 3D Path, it’s heavier than Separate. |
Keeping these tips in mind will allow you to create a tight, efficient 2D game character in Harmony while taking advantage of all the great tools.
Here are some things you should do:
|
•
|
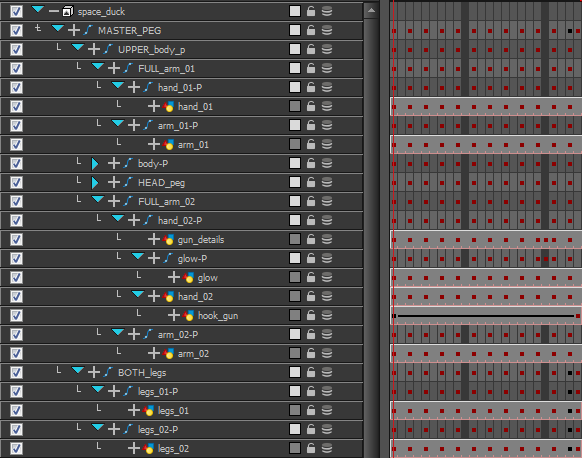
Create a simple parent-child relationship hierarchy in the Timeline view. |
|
•
|
Use peg layers to contain keyframe animation data, set to Separate. |
|
•
|
Use drawing layers to draw on, creating new drawings when needed. |
|
•
|
Use the Rotate tool to set the pivot points on the peg layers. |
|
•
|
Name your layers properly so if you need to fetch a specific layer’s pivot point later on in the game engine, you can recognize the layer you need easily. If you have a top-level Group A, which has a child group inside it (Group B), and the drawing layer is a child of Group B, then the drawing layer is exported as A_B_DrawingLayer. |
That’s about it! You can use any of the drawing tools you want: Pencil and Brush tools, textured lines, solid areas, and gradients. Each individual drawing will be rendered out and assembled into a sprite sheet later.


