Chapter 13: Installing Harmony Cloud on Mac OS X
Configuring Toon Boom Harmony Cloud
 How to install Harmony Cloud as a service
|
1.
|
From Finder, go to Applications > Toon Boom Harmony 11.2 > Tools. |
|
2.
|
Double-click on Configuration Assistant. |
|
3.
|
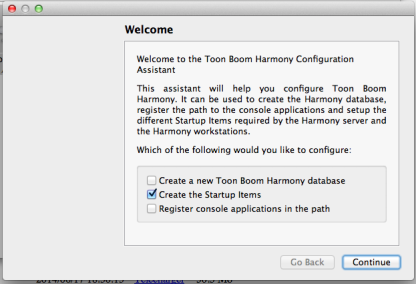
Select the Create the Startup Items option and click Continue. |
|
4.
|
Select the Create Harmony Cloud Server Startup Item option and click Create. |

A message box confirms that the server has been successfully installed.
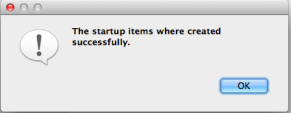
The Finish window opens.

|
7.
|
Open the Terminal and start the service: |
sudo SystemStarter start ToonBoomHarmonyCloudServer
Customizing the Harmony Cloud Service
You have the ability to customize the Harmony Cloud service. This can be done using your favourite text editor.
How to customize the Harmony Cloud service
sudo vi /Library/StartupItems/ToonBoomHarmonyCloudServer/ToonBoomHarmonyCloudServer
|
3.
|
Locate the StartService() function. |
sudo -u usabatch "$USADIR/macosx/bin/HarmonyCloud_starter" "$USADIR/macosx/bin/HarmonyCloud" --pid-file $USABATCHHOME/ToonBoomHarmonyCloudServer.pid --docroot "$USADIR/resources/cloud" --http-port 8080 --http-address 0.0.0.0 --threads 10 --config "$USADIR/resources/cloud/wt_config.xml" 2>>/Library/Logs/ToonBoomHarmonyCloudServer.log >>/Library/Logs/ToonBoomHarmonyCloudServer.log &
Where the available parameters for modification are:
|
‣
|
--http-port: The port to deploy to |
|
‣
|
--http-addressIPv4 (example: 0.0.0.0) or IPv6 Address (example: 0::0) |
|
‣
|
--threadsnumber: Number of threads |
|
5.
|
Save and close the file. |
Running Harmony Cloud Manually
If you do not want to run Harmony Cloud as a service, you have the option to manually start the Harmony Cloud server.
How to manually run Harmony Cloud
|
1.
|
Open the Terminal and navigate to /Applications/Toon Boom Harmony 11.2/tba/macosx/bin. |
|
2.
|
Run ./HarmonyCloud.sh. |
You can change the default port used by Harmony Cloud by modifying the HarmonyCloud.sh file. Use your favourite text editor to open the file and change the value of the –http-port parameter. See bolded text below:
./HarmonyCloud --docroot ../../resources/cloud --http-address 0.0.0.0 --http-port 8080 --config ../../resources/cloud/wt_config.xml
Managing the Harmony Cloud service
If at any point you need to start/stop or restart the Harmony Cloud server, you can do so through the SystemStarter in Mac OS X.
| To start the service |
sudo SystemStarter start ToonBoomHarmonyCloudServer
|
| To stop the service |
sudo SystemStarter stop ToonBoomHarmonyCloudServer
|
| To restart the service |
sudo SystemStarter restart ToonBoomHarmonyCloudServer
|
Alternatively, you can start or stop all Harmony Services with the following commands:
| To start all services |
/Applications/Toon Boom Harmony 11.2/tba/macosx/bin/Startus can be used to start all services
|
| To stop all services |
/Applications/Toon Boom Harmony 11.2/tba/macosx/bin/Stopus can be used to stop all services
|
Network Setup
Setting Up a static IP
You will need to set up a static IP for accessing the Harmony Cloud application.
How to set up a static IP
|
1.
|
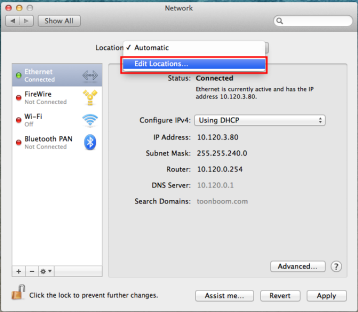
Open the System Preferences window. |
|
3.
|
From the Location menu, select Edit Locations. |
|
4.
|
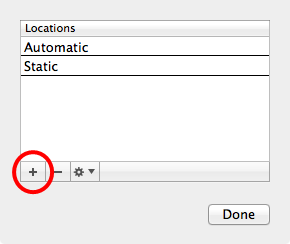
Click the plus sign (+) and enter an appropriate name. Click Done. |
|
5.
|
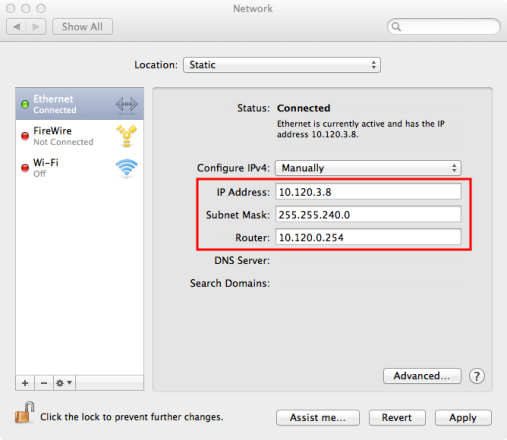
Configure your static IP with information pertaining to your connection and click Apply. |
Opening a Port for External Connection
To allow other computers to access your Harmony Cloud server, it is necessary to open a port in your firewall. Harmony Cloud uses port 8080 by default.
How to open a port for external connection
|
1.
|
Open the System Preferences window. |
|
3.
|
Click the lock icon at the bottom of the window to enable editing. |
|
4.
|
Enter your password when prompted. |
|
5.
|
Select the Web Sharing option. |
|
7.
|
Click the lock icon at the bottom of the screen to enable editing. |
|
8.
|
Enter your password when prompted. |
|
9.
|
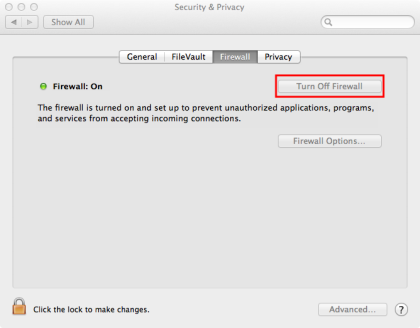
Click Turn Off Firewall. |
|
10.
|
Close the System Preferences window. |


