Performing a Trial Scan
The Harmony Scan module allows you to perform test scans to determine the proper threshold or gamma setting for a drawing. This test scan allows you to preview the scanned image without saving it.
You can perform a trial scan by auto feeding the drawing through the scanner, or by pegging the drawing on the scanner.
Refer to the Toon Boom Animation website for a complete list of the supported SCSI adapters, scanners and auto-feeders. http://www.toonboom.com/products/harmony/ and click on Detailed System Requirements.
To perform a trial scan:
|
1.
|
Launch the Harmony Scan module and load your drawing list. |
|
2.
|
Place the drawing either on the scanner pegs or in the automatic document feeder (ADF). |
|
3.
|
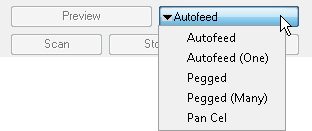
Select the appropriate feeding type from the Control Panel: |
|
‣
|
Autofeed: Select this option to feed the drawings through the automatic document feeder (ADF). |
|
‣
|
Autofeed (One): Select this option to accept one drawing from the ADF when the Scan button is being pressed. |
|
‣
|
Pegged: Select this option to scan a drawing from the flatbed each time the Scan button is being pressed. |
|
‣
|
Pegged (Many): Select this option to automatically scan a drawing from the flatbed every five to ten seconds (depending on the time required to process the drawings). |
|
‣
|
Pan Cel: Select this option to scan a drawing that is bigger than the scanner window in separate sections. |
|
‣
|
If you are manually pegging the drawing, make sure you close the scanner cover before you click the Preview button. |
When the scan is complete, the drawing appears in the Scan module preview area.
|
5.
|
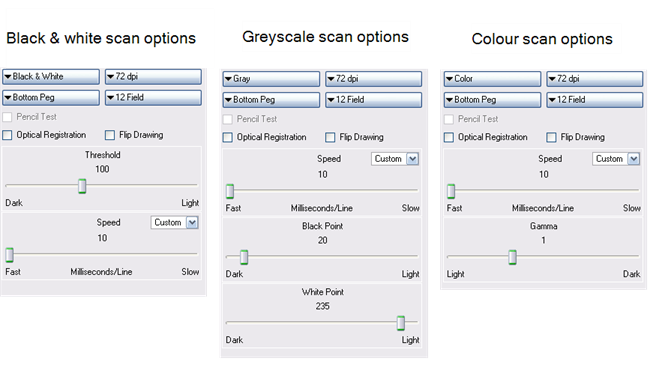
Adjust the image parameters. Different options appear on the Control Panel, depending on the Scan Type you selected earlier. Refer to topic to learn how to set the Scan Type. |
|
‣
|
Threshold
When using a Black and White scan type, use this slider to adjust the exposure. |
|
‣
|
Black Point
When using a Greyscale scan type, use this slider (in conjunction with the White Point Slider) to adjust the contrast. Greyscale values that are less than the selected value will be converted to black. |
|
‣
|
White Point
When using a Greyscale scan type, use this slider (in conjunction with the Black Point Slider) to adjust the contrast. Greyscale values that are greater than the selected value will be converted to white. |
|
‣
|
Gamma
When using a Colour scan type, use this slider to adjust the colour contrast. |
|
‣
|
Speed
Use this slider to adjust the time required to scan a line (measured in lines per millisecond) at which to scan drawings, if your scanner supports variable speeds. Use the drop-down menu to set predefined speeds of Fast or Normal.
Use the drop-down menu to set a predefined or custom speed: |
|
•
|
Fast: Set a predefined speed for fast scans. |
|
•
|
Normal: Set a predefined speed for normal scans. |
|
•
|
Custom: Set a custom speed for your scans. The slider will become active and you can use it to set the required speed. |
|
6.
|
Click Preview to view the changes. |
|
7.
|
Keep adjusting these values until you get the effect you want. These values will be applied to all the subsequent drawings you scan. |
To keep the image from a trial scan without having to re-scan the drawing, press the Save button. This assigns the image to the currently selected drawing name in the Drawing List and marks it as Scanned.