Animating in Stop-motion
To start animating your character, start by doing your key poses. In fact, most of your time will be spent doing key poses. It is better to work with Stop-Motion keyframes as Animate will not automatically create the interpolation between your keyframes.
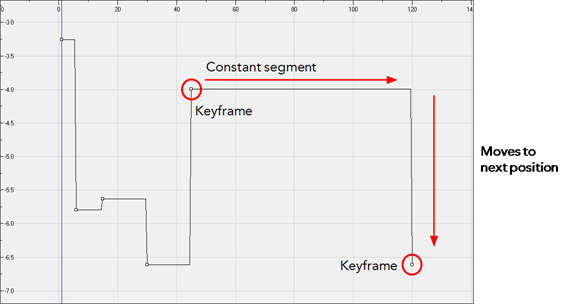
When using Stop-Motion keyframes, also known as step keyframes, the segment between two keyframes is constant. There is no animation generated by the computer between the poses. The drawing remains in position until the next keyframe, then movies to its new position.
Creating a Stop-motion Keyframe
You can create a stop-motion keyframe in several different ways. You can have Animate create it automatically, transform a motion keyframe into a stop-motion keyframe, or even switch your preferences to get Animate to always create stop-motion keyframes by default.
To automatically create stop-motion keyframes:
| 1. | In the top menu, make sure the Animation > Stop-motion Keyframe option is deselected. |
| 2. | In the Timeline view, select the cell where you want to add a keyframe. |

| 3. | Do one of the following: |
| ‣ | Right-click (Windows) or [Ctrl]+Click (Mac OS X)) on the selection and select Add Keyframe. |
| ‣ | Click the Add Keyframe |
| ‣ | Press [F6]. |
In the Camera view, if the Animate mode is enabled, as soon as you move the selected element, a keyframe is automatically created on the current frame.

To convert a motion keyframe into a stop-motion keyframe:
| 1. | In the Timeline view, select the motion keyframes to convert into stop-motion keyframes. The default keyboard shortcut is [S]. |

| 2. | Do one of the following: |
| ‣ | Right-click (Windows) or [Ctrl]+Click (Mac OS X) on the selection and select Set Stop-Motion Keyframes. |
| ‣ | Click Stop-Motion Keyframe |
| ‣ | Press [Ctrl] + [L] (Windows) or [⌘] + [L] (Mac OS X). |

Related Topics
| • | Animating Using Computer-generated Interpolation |