Set 3D Animation Timing
The Set 3D Animation Timing dialog allows you to set the timing for 3D models that contain animated 3D layers. Any 3D model contained in a usd, fbx or alembic file can have their animation layers applied directly to the timeline.
By default, the 3D model will appear static only showing the first frame of the default layer of the animation. The 3D Animation Timing will allow you to set the animation to the Xsheet and timeline without needing to input the individual values of each exposure of the 3D animation.
From the dialog you can set the exposures, apply start and end frames as well as create cycles. Once you have filled all the properties in the Set 3D Animation Timing dialog, the Xsheet will fill automatically with the names of the animation layer frames in sequence and a layer containing all the exposures will appear on the timeline.
| Section | Description |
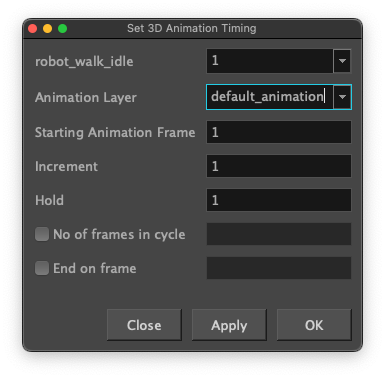
| 3D Model |
Allows you to select the 3D model layer you want to set the timing for. TIP The dropdown will be available when you have 3D models sharing a layer.
|
| Animation Layer | If your 3D model contains an animated layer, you can select the animation layer you wish to apply to your timeline. |
| Starting Animation Frame | The first number in the sequence. |
| Increment |
Lets you type the number by which the drawing number will increase from frame to frame. For example, an increment of 1 gives you: 1-2-3-4; an increment of 2 gives you: 1-3-5-7; and -2 gives you this: 8-6-4-2. |
| Hold | The exposure holding value. |
| Number of frames in cycle | Enable this option to cycle through the values and enter the number of cycles in the Cycle field. |
| End of frame | Enable this option to stop the fill at a specific frame within the selection. Indicate the frame number in the End of frame field. |
| Apply | Apply the timing to your 3D animation without closing the dialog. |
| OK | Apply the timing to your 3D animation and immediately close the dialog. |
| Close | Abort the Set 3D Animation Timing operation. |